Propeller Wash
- Duy Pham
- Kester Scandrett
The potential effects of propeller-induced velocities (propeller wash or propwash) on the erosion, transport, and re-suspension of contaminated sediments can be significant. EEMS uses an integrated propeller wash sub-module that can utilize the automated information system (AIS) telemetry from vessels regarding their position and orientation every few minutes or any user defined ship track information.
Propeller Wash Setting in EE Forms.
The Propeller Wash module has been developed to simulate the impact of ship propeller jet on bed erosion and suspended solids. It is an important element in the development of plans for improvement and optimum utilization of waterways.
To activate this module, RMC on Modules from the Model Control form, then check on the box of Propeller Wash as shown in the Figure 1.
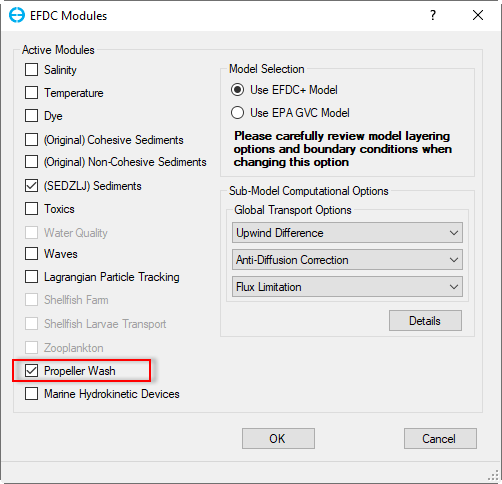
Figure 1. Activate Propeller Wash module.
RMC on the Propeller Wash module under the Modules option in the Model Control as shown in the Figure 2. The Propeller Wash form will be displayed as shown in the Figure 3. This shows the total number of ships and the number of tracks.
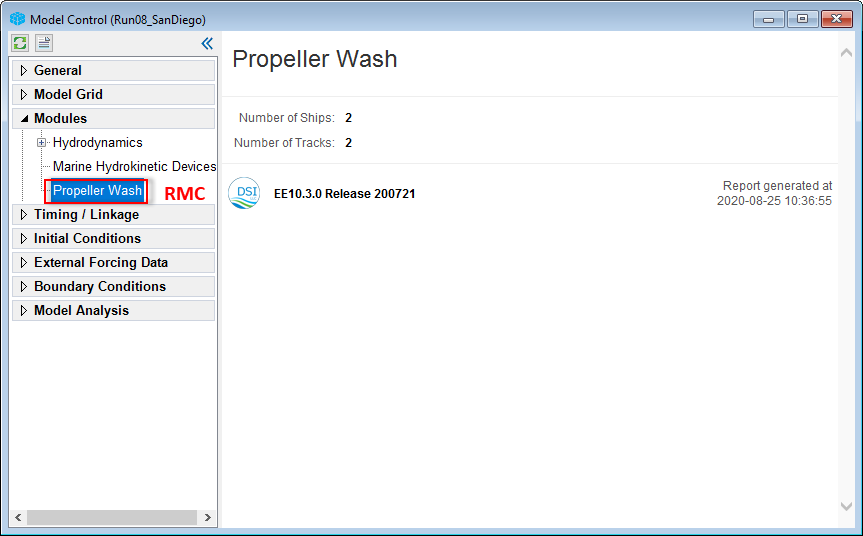
Figure 2. Edit Propeller Wash module.
The Propeller Wash form has three tabs consisting of: General, Ships, and Tracks tabs.
The General tab consists of General Settings, Mesh Settings and Model Parameters frames as shown in Figure 3. The Add Propwash Velocities option allows the user to add propeller efflux momentum to the ambient flow field.
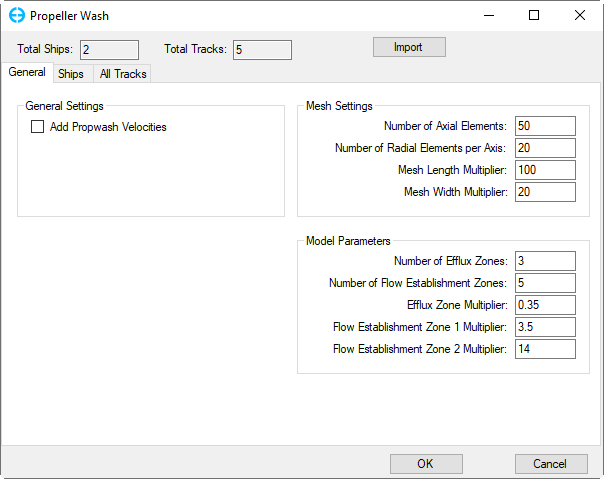
Figure 3. Propeller Wash form: General tab.
When first opening the form to create a new model the Ships tab will be empty as shown in Figure 4. The user must fill in the information fields for the ships from Ship Info and Propeller Info sub-tabs. The MMSI Code and Ship Name fields are required to be filled first because those fields are essential indices. Click the Add Ship button and the ship is added to the List of Ships fame as shown in Figure 5. A new ship can be added by selecting Add New Ship from RMC's options as shown in Figure 6. Ships are distinguished by MMSI Code. If a user imports multiple files having the same MMSI, the points are simply appended to the existing ship track specified by the given MMSI.
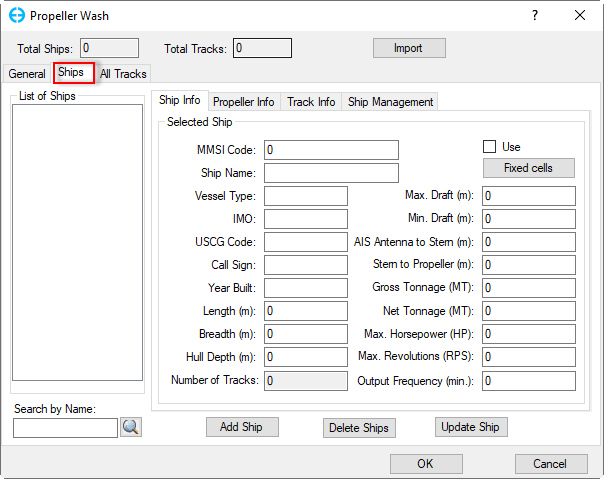
Figure 4. Propeller Wash Form: Ships tab.
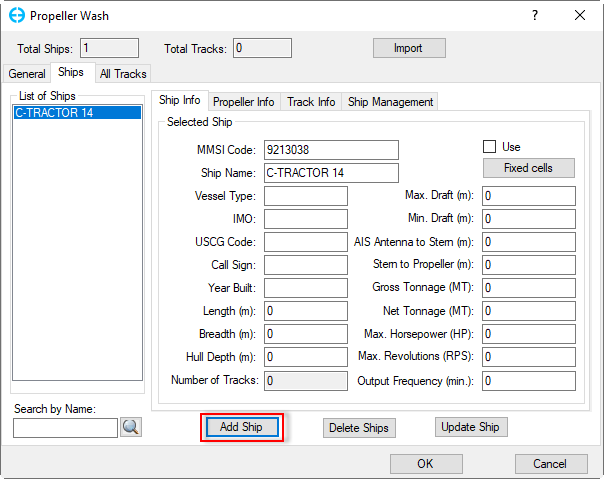
Figure 5. Propeller Wash Form: Add New Ship (1).
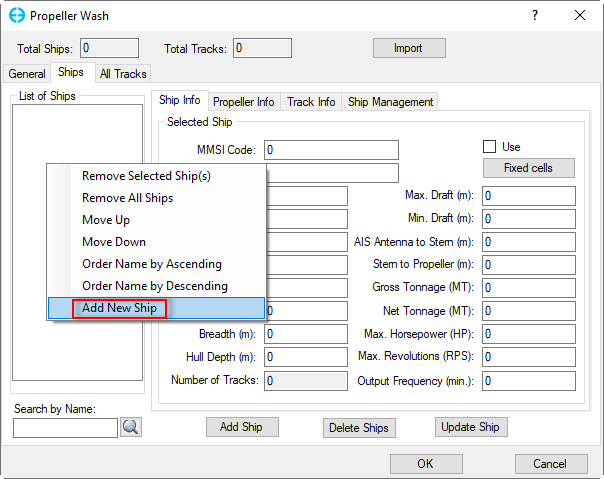
Figure 6. Propeller Wash Form: Add New Ship (2).
When the user clicks on the Ships tab, ships names will be displayed in the List of Ships. If the ship name is missing, the MMSI code will be displayed. After selecting a ship, the information for the selected ship will be presented in the Ship Info, Propeller Info, Tracks Info and Ship Management sub-tabs as shown in Figure 7.
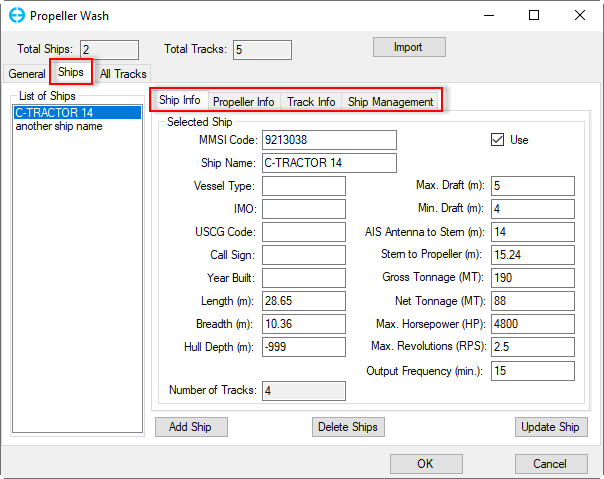
Figure 7. Propeller Wash Form: Ships sub-tabs.
Figure 8 and Figure 9 illustrate terminologies and dimensions which relate to the propeller of a ship. These dimensions are used in EE forms shown in Figure 10 and Figure 11.
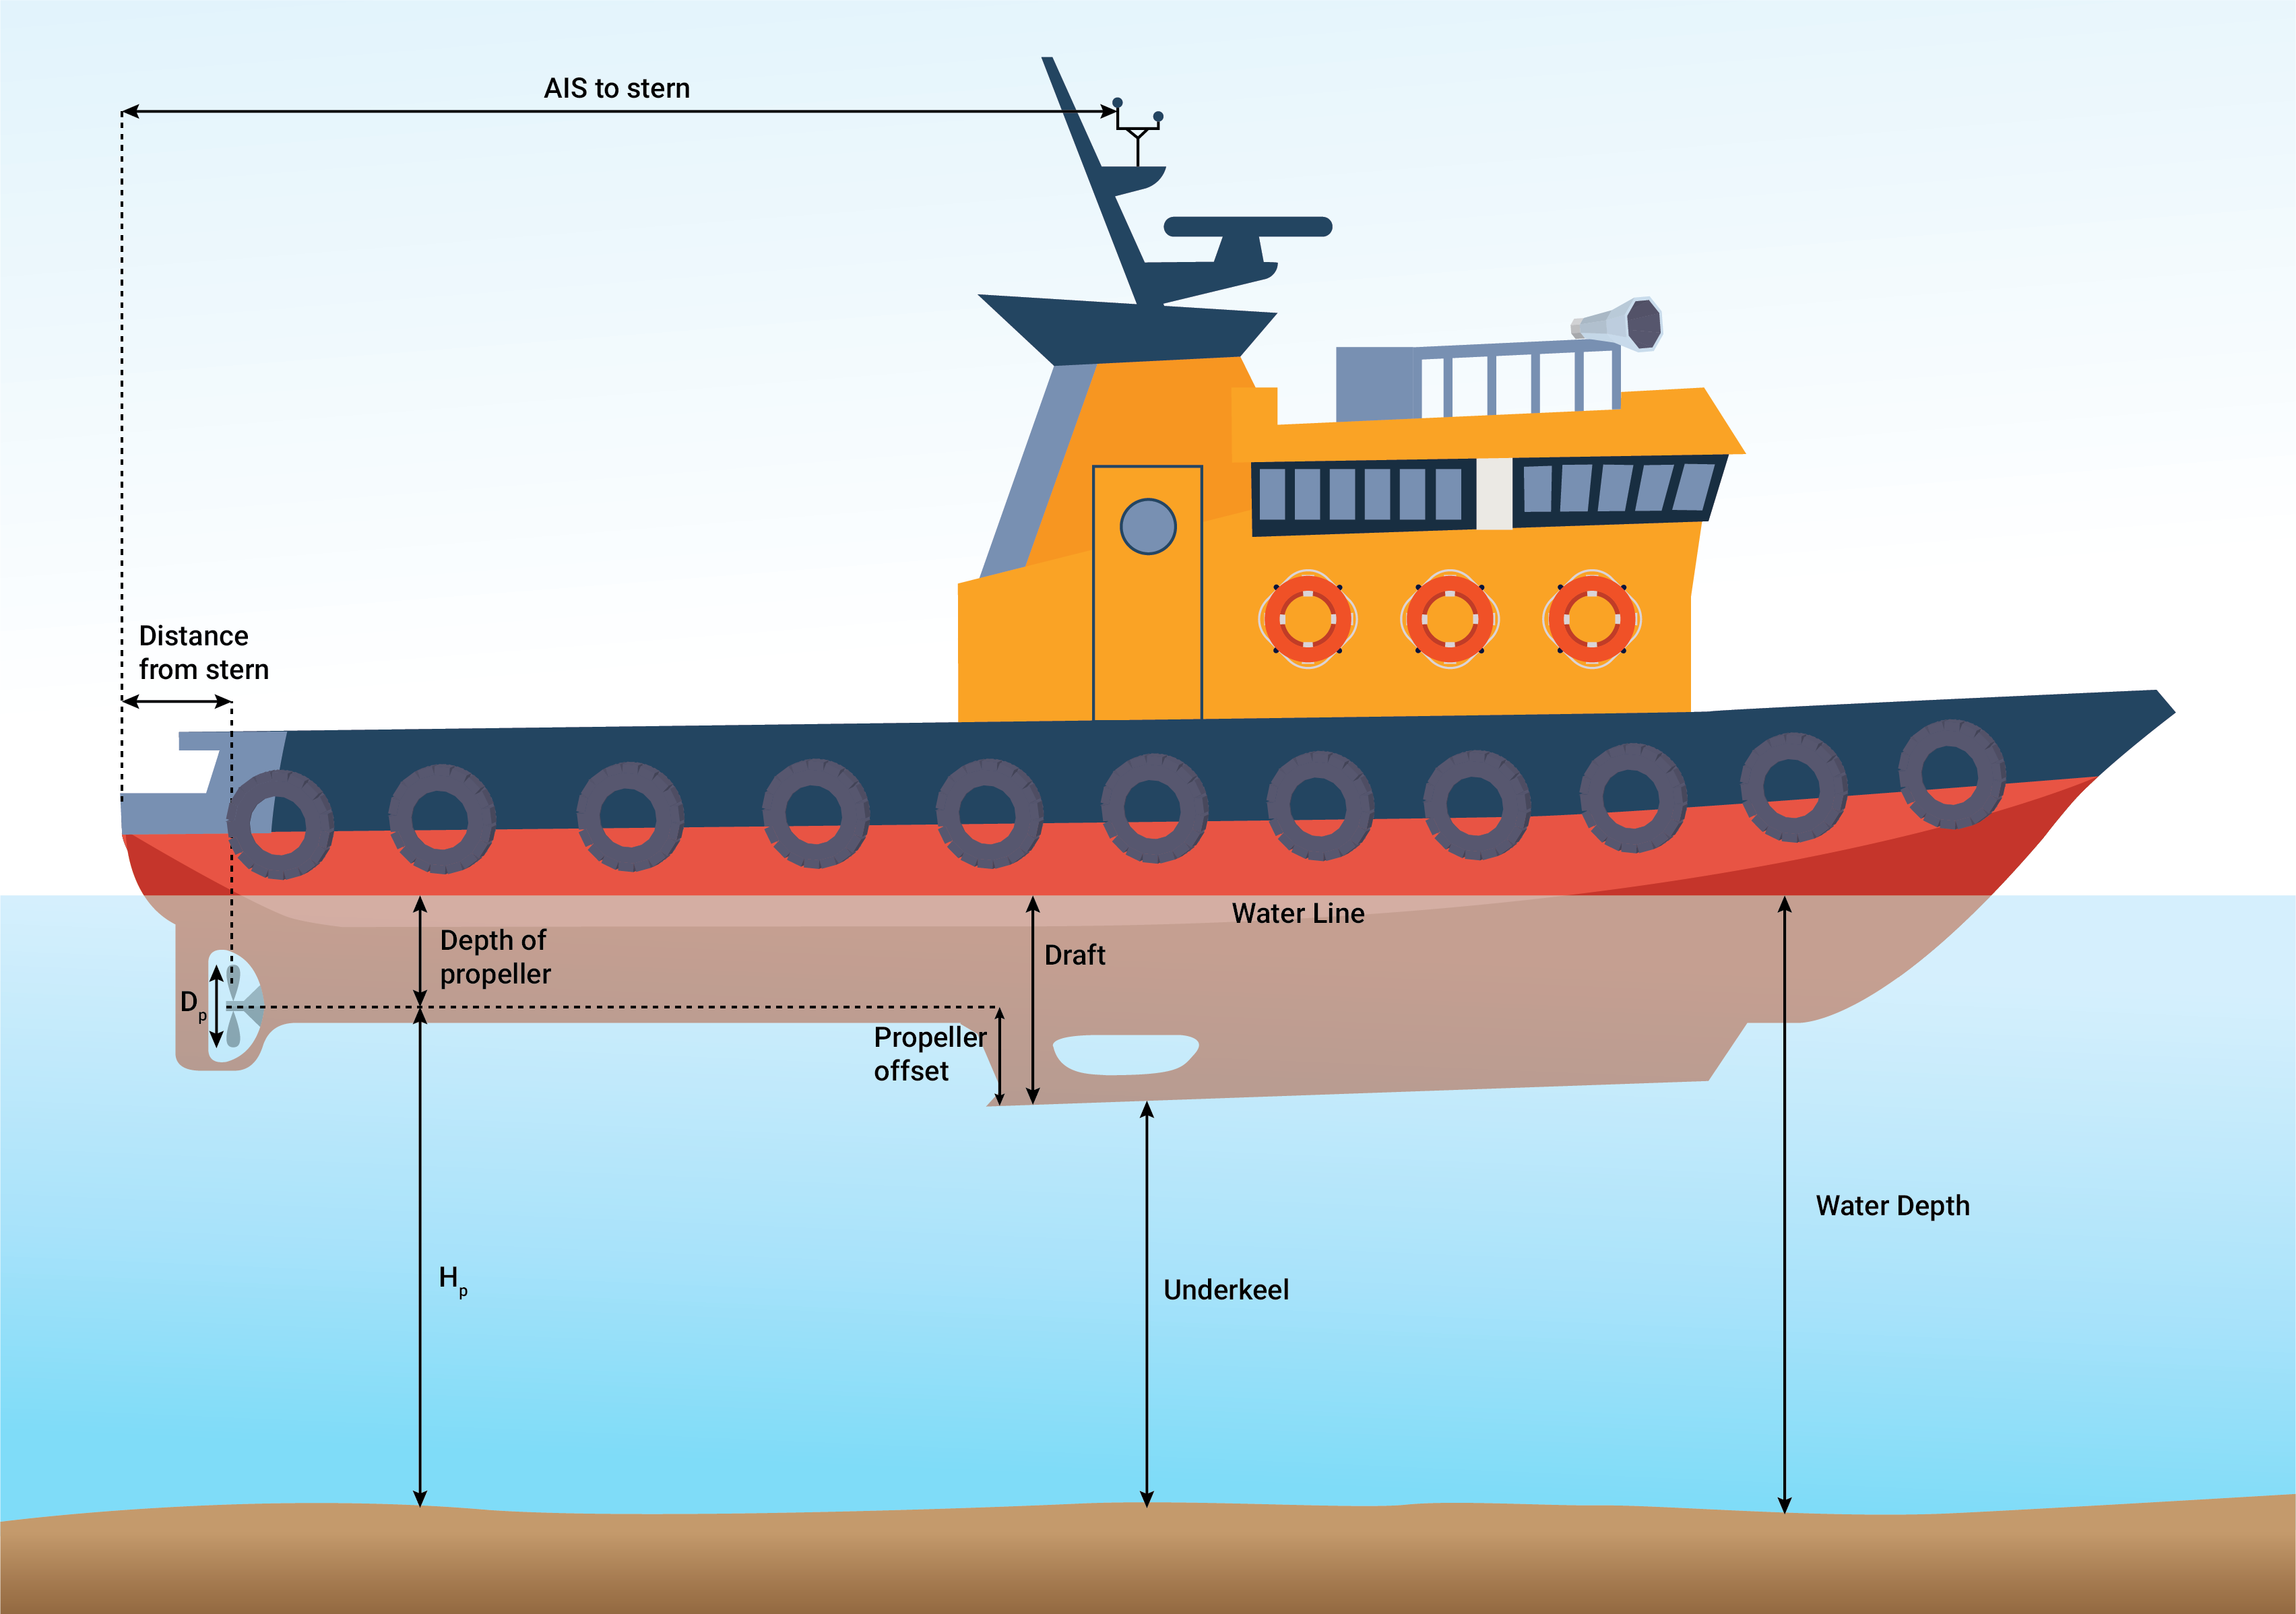
Figure 8. Propellers with Side view of a tugboat.
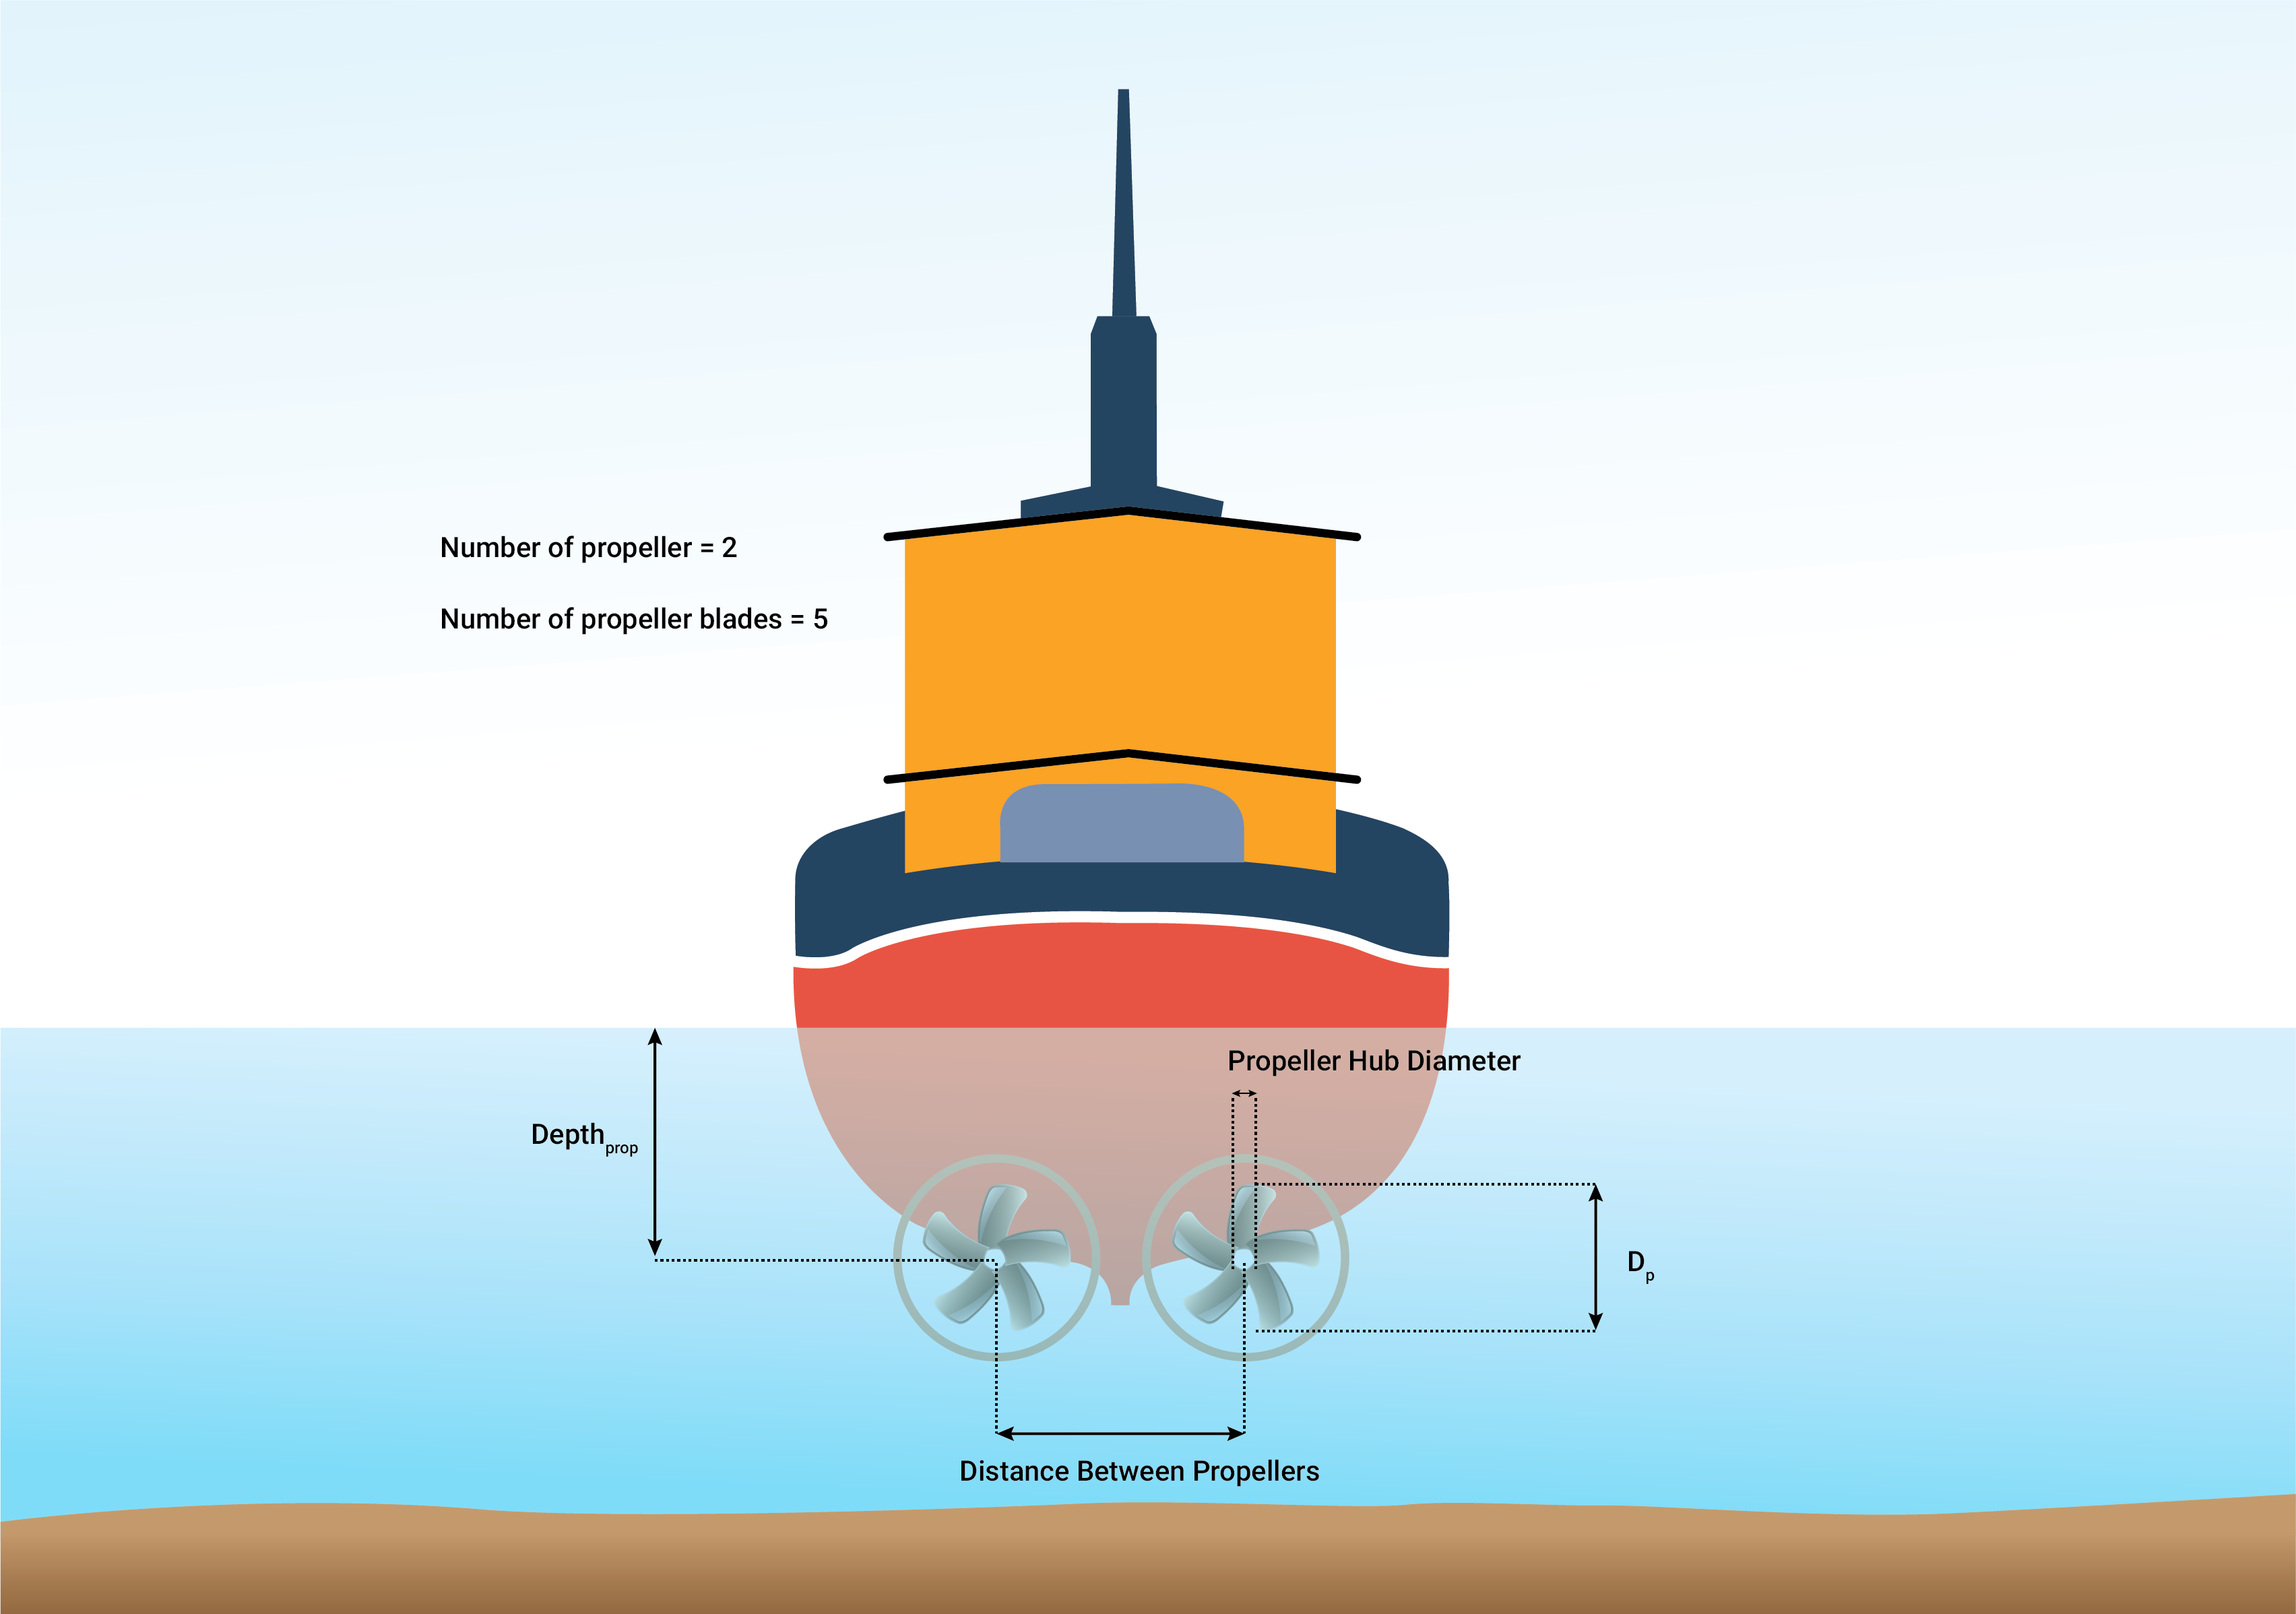
Figure 9. Propellers with back view of a tugboat.
Figure 10 displays general information for the selected ship such as MSSI Code, ship name, ship dimensions, number of tracks, etc.
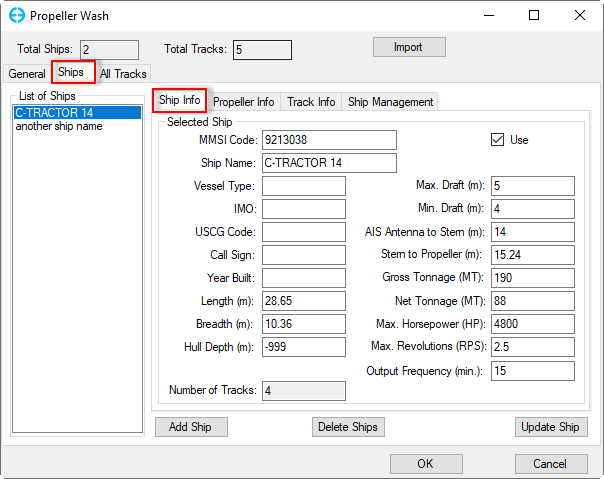
Figure 10. Ships tab: Ship Info.
Figure 11 displays propeller information for the selected ship such as the number of propellers, number of propeller blades, propeller diameter, etc.
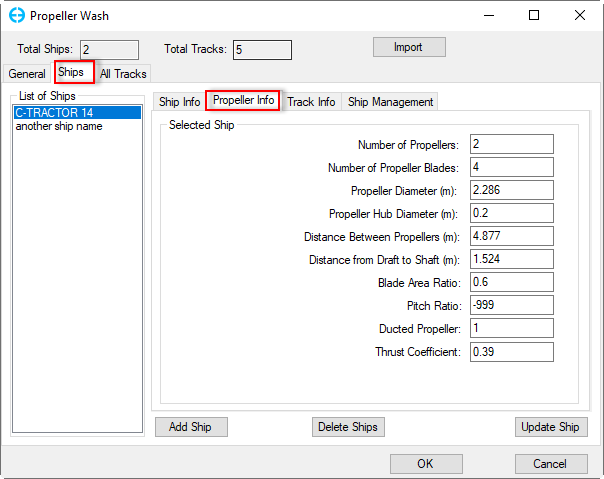
Figure 11. Ships tab: Propeller Info.
Figure 12 displays track information for the selected ship such as number of tracks, track begin and track end time in Julian days, number of points in each track, etc. The Delete Current Track will remove the current track.
Fill Missing Data frame:
Interpolate Missing Data
Compute Heading, Course & Speed
Extrapolation
Overwrite All Values
Set Value
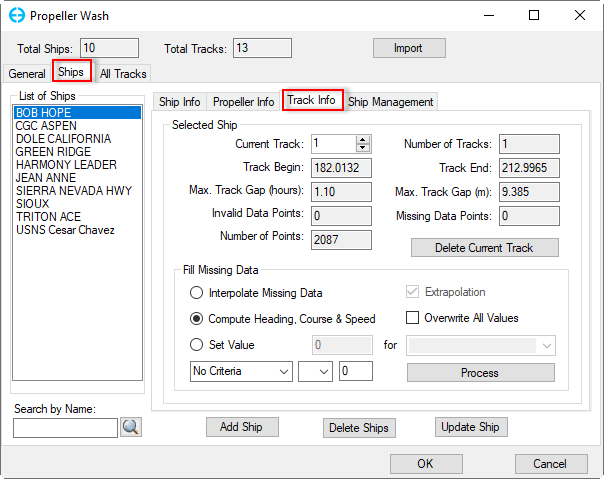
Figure 12. Ships tab: Tracks Info.
Figure 13 displays ship management for all ships listed. The user can select ships based on criteria in the Ship Selection frame by selecting a parameter from the drop-down list then select Comparison and Target Value. The criteria will be applied for the Select From and Select Options below, then click the Select button to proceed. The result is that ships that meet the selection criteria will be highlighted on the List of Ships.
Number of Selected Ships: for the ships selected from the List of Ships, the number for selected ships will be displayed (e.g. 3). For these ships, the user can assign a value for each field from the drop-down list using the Assign button. In addition, the missing fields can be filled by using online data using the option of downloading data from Vessel Finder or Marine Traffic sites. The online downloading process will apply to each ship in a step-wise manner.

Figure 13. Ships tab: Ship Management.
Figure 14 displays three options for editing ship information including Add Ship, Delete Ship, and Update Ship. The Add Ship allows the adding of a new ship to the ships list, while Update Ship is used for saving the information of ships when the user changes or update fields in the Ship Info sub-tab. Delete Ship is used to remove ships from the ships list.
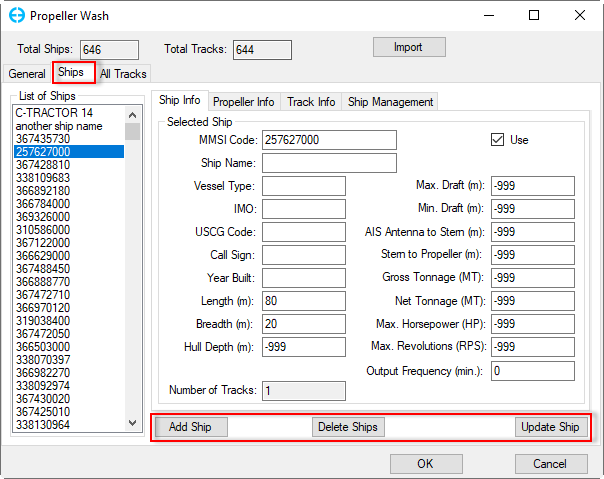
Figure 14. Ships tab: Add, delete, update options.
When you select a ship from the List of Ships then RMC, a number of options will be displayed as shown in the Figure 15, including the following options:
Remove Selected Ship(s): will delete the selected ship
Remove All Ships: will delete all existing ships in the list
Move Up: move the selected ship up
Move Down: move the selected ship down
Order Name by Ascending: will sort the ships list with the lower ID numbers will be at the top of the list and letters sorted is alphabetically from A to Z.
Order Name by Descending: will sort the ships list with the larger ID numbers will be at the top of the list and letters sorted is alphabetically from Z to A.
Add New Ship: add a new ship to the list. Once this option is selected, a duplicate ship will be added to the bottom list of ships as shown in Figure 16. The user should LMC on another ship then LMC back on the duplicate ship and then enter information for the new ship including propeller information. Click the Update button when after completing filling this information, then click the OK button to save the information of the new ship.
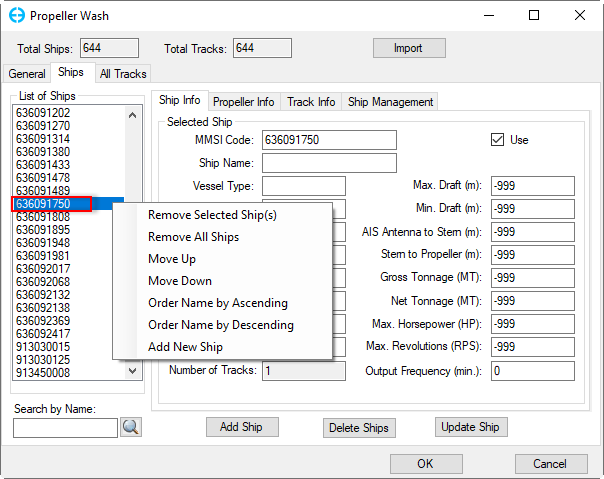
Figure 15. Ships tab: Right Mouse Click options.
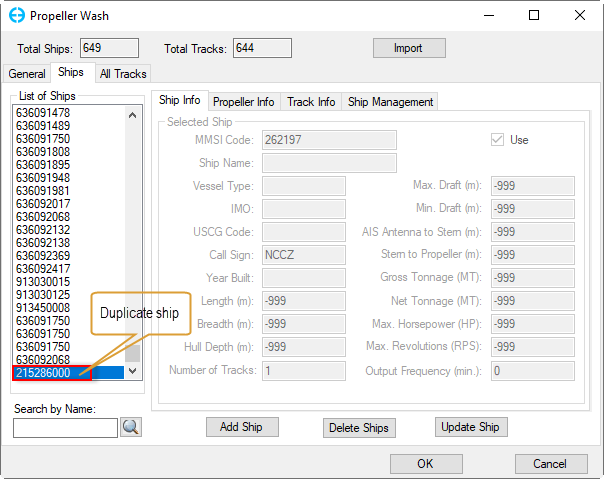
Figure 16. Ships tab: Add New Ship.
Figure 17 shows the All Tracks tab, this tab can be used for filling missing data of tracks, split tracks and delete tracks.
Fill Missing Data frame:
Compute Ship Speed and Direction
Interpolate Missing Data
Extrapolation
Split Tracks frame:
Split using Time Duration (hours)
Split using Track Point Distance (m)
There are three options for removing tracks, including the following options:
Delete Track Points Outside Simulation Period: The user needs to enter the beginning and end time then click the Delete button. This will remove tracks outside of the simulation period.
Delete Track Points Outside Domain Extent: Imagine that a rectangle covers the model domain and four corners of the rectangle are controlled by values of the West, East, South and North. These values are updated automatically in the model domain. However, the user can change these values by entering new values into the box then clicking the Delete button to remove tracks outside the domain. Note that in case the track has two points, one point is inside the domain and the other is outside of the domain, then the two points of the track will be remain.
Delete Track Points Outside Polygons: This option is similar to the function to remove tracks outside the domain extents, this option allows the user to remove tracks outside of existing polygons prepared in advance by browsing to the polygons file then clicking the Delete button.
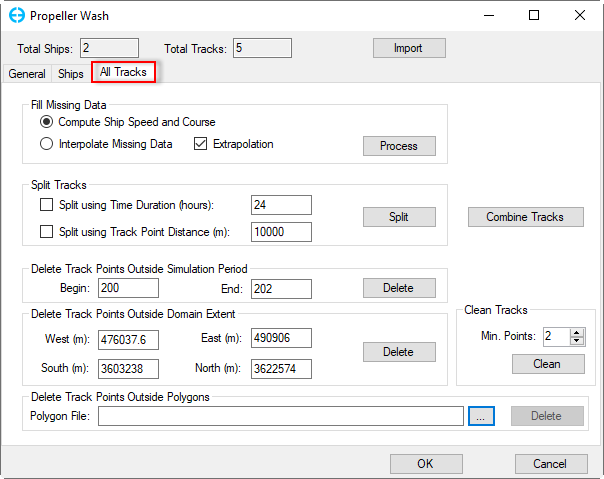
Figure 17. Propeller Wash form: All Tracks tab.
In cases where a ship tracks file has been prepared in advance, it can be imported to the Propeller Wash form by using the Import button as shown in Figure 18. After clicking on the Import button, the Import Ship Tracks form will be displayed as shown in Figure 19. The fields in the data file as shown in the Figure 20 as an example. From the form in Figure 21, the user should click on the Browse button to browse to the data file, fields in the Import Ship Tracks form will be filled by taking available fields from the data file as shown in Figure 21. Click OK button to start importing ships tracks, when the process is complete the total ships and total tracks will be updated as shown in Figure 22.
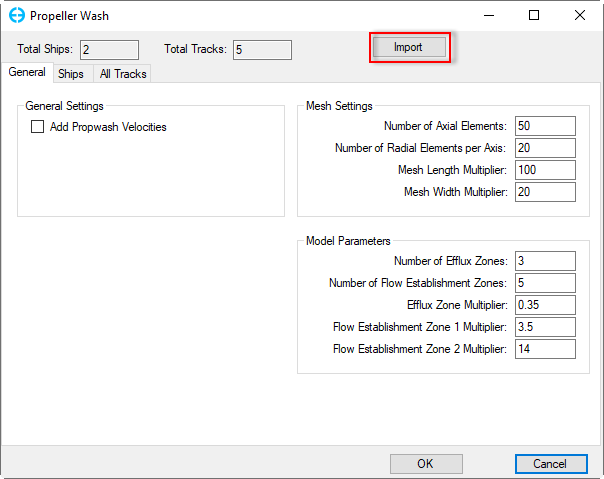
Figure 18. Propeller Wash form: Import Ship Tracks.
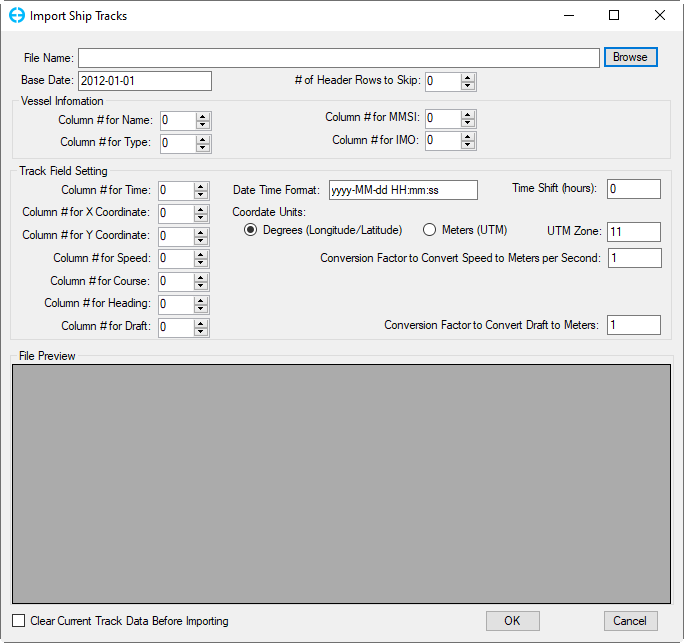
Figure 19. Import Ship Tracks Form.
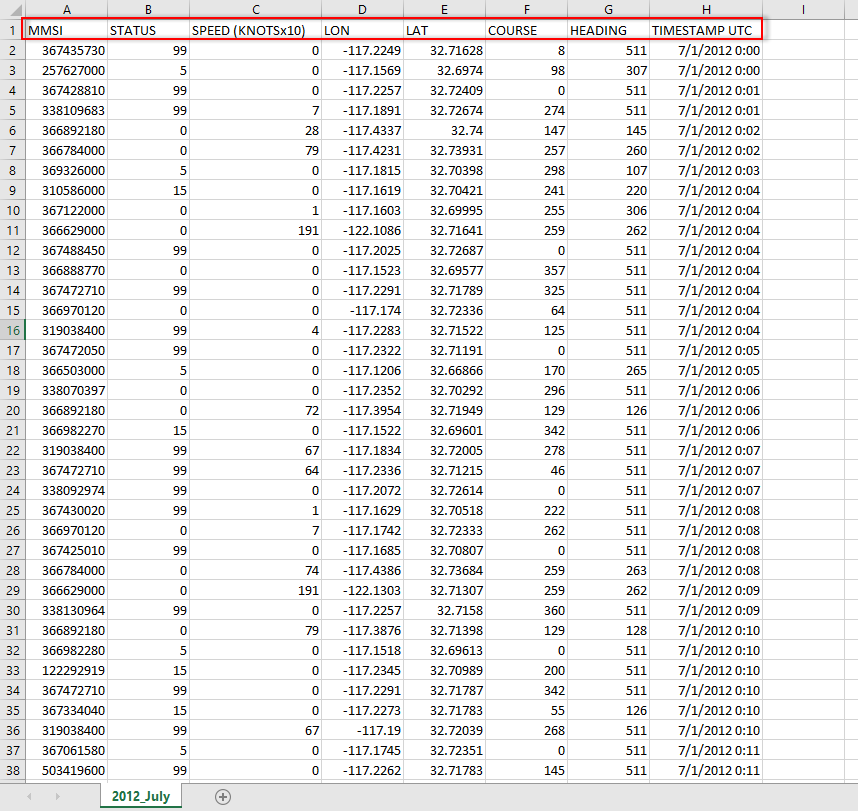
Figure 20. Fields in the Ship Tracks data file (CSV Format).
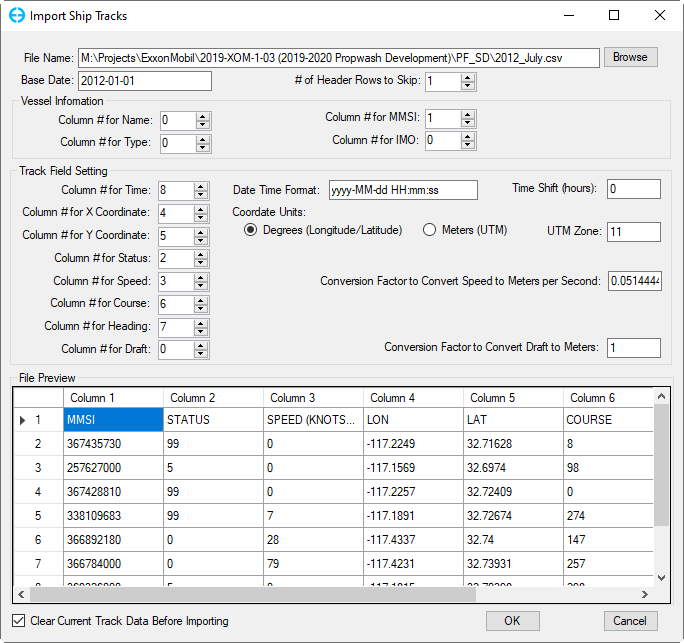
Figure 21. Import Ship Tracks form with fields filled.
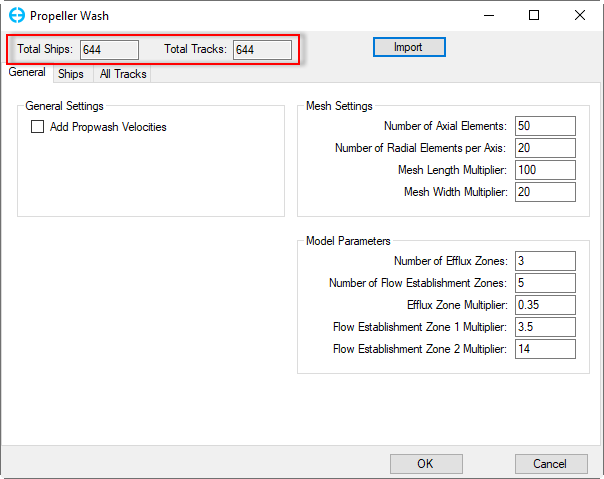
Figure 22. Import Ship Tracks completed.
Propeller Wash in the 2DH View
To display the simulation results, load the EFDC+ model with output for the propeller wash module. Open a new 2DH View from the 2DH View menu or the 2DH View button from the main toolbar of EE main form.
The following steps show how to add a propwash mesh like that shown in Figure 23.
- Click the Add New Layer in the Layer Control.
- Select PropWash for Primary Group in the 2DH View Option.
- Select PropWash Mesh for Parameter
- Select a field data from the drop-down list (e.g. Magnitude Velocity)
- Select the ship name from the list then click the Add button. In case the All box is checked then all ships will be selected.
To add a layer for the ship track, instead of selecting PropWash Mesh in step 3, then select the Ship Track.
Figure 24 shows the layers of PropWash mesh with velocity and ship tracks added to the 2DH View.
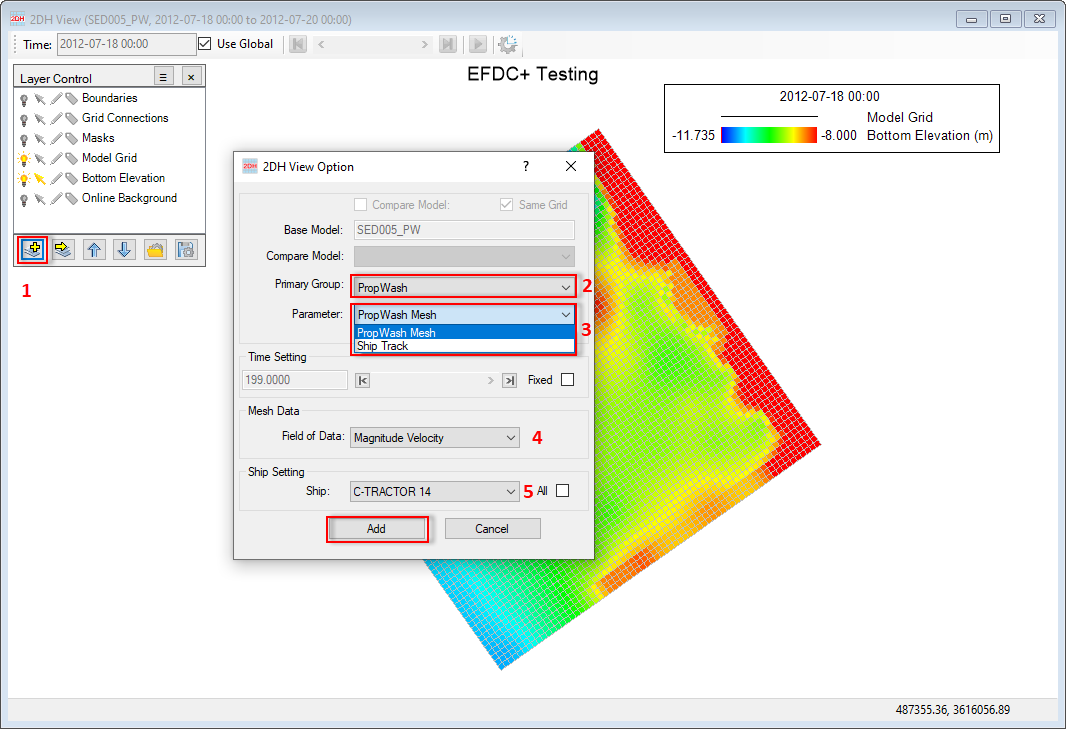
Figure 23. 2DH View: Adding a PropWash Mesh layer.
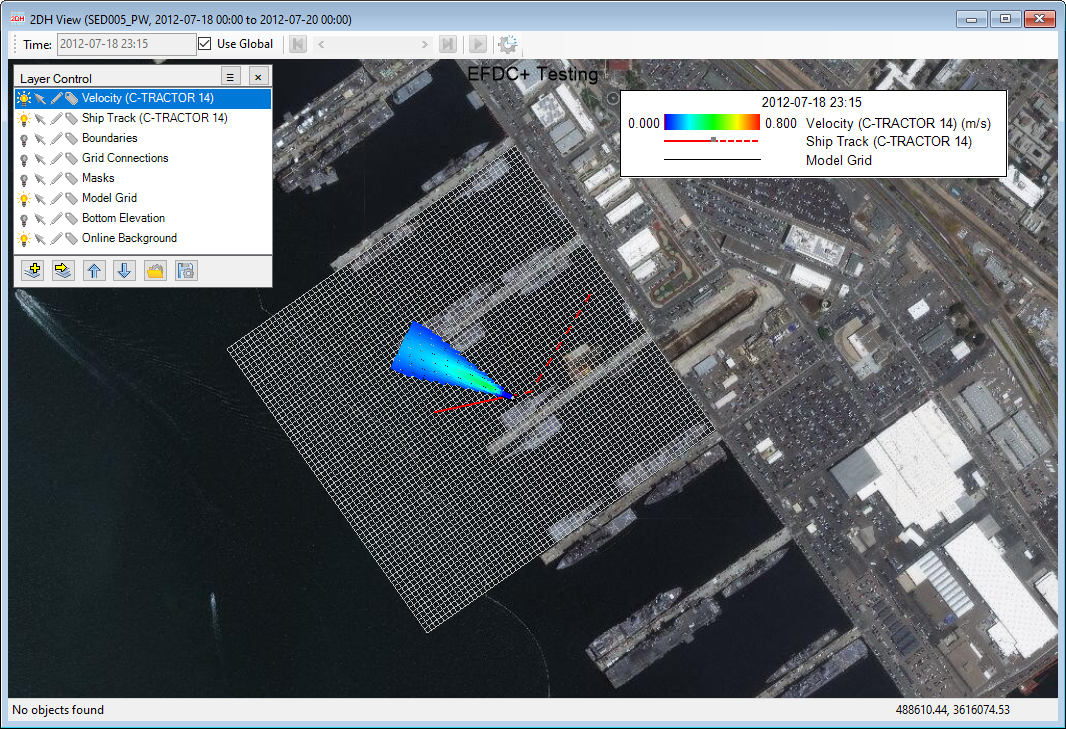
Figure 24. PropWash Mesh (Velocity) and Ship Track Layers added in 2DH view.
The user can change the PropWash Mesh and Ship Track layers by selecting the layer in the Layer Control then RMC on these layers.
RMC options for the PropWash Mesh (e.g Velocity) are shown in Figure 25. They include the following options:
Properties: is used to set color ramp, value range, points size, etc as shown in Figure 26.
Edit: when this option is selected, the 2DH View Option form pops up allowing the user to change from the current layer to another parameter layer.
Zoom to Layer: zooms to the propwash mesh layer
Export: exports the propwash mesh layer (e.g velocity) to files with a different extension such as *.dat, *.p2d, *.txt, and *.xyz. All these files contain three columns X, Y coordinates, and Z (value of parameter e.g velocity) at a specific time (Julian day).
Remove: deletes this layer from the Layer Control.
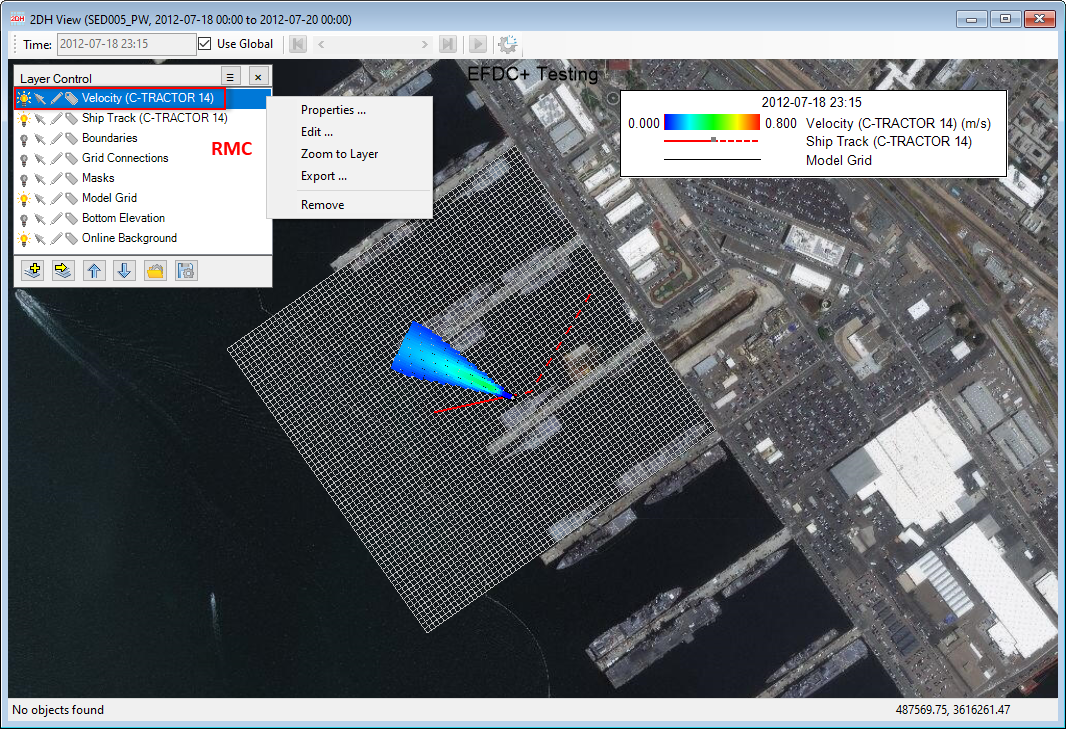
Figure 25. RMC Options for PropWash Mesh Layer.

Figure 26. PropWash Mesh Data Properties form.
RMC options for the ship track are shown in Figure 27. They include the following options:
Properties: when this is selected, the Ship Track Layer form will be displayed as shown in Figure 28. From this form, the user can set line style, color, and width for the tracks. The user can also show the current ship track only or all ship tracks by using two check-boxes Hide All Ships Except Active One and Hide All Tracks Except Active One.
Edit: when this option is selected, the 2DH View Option form is displayed, allowing the user to change from the current layer to another parameter layer.
Zoom to Layer: zooms to the ship track layer
Remove Outside Points: This allows the user to browse to a defined polygon then remove track points outside the polygon.
Export: exports the ship track to a JSON file format (*.json)
Remove: deletes this layer from the Layer Control.
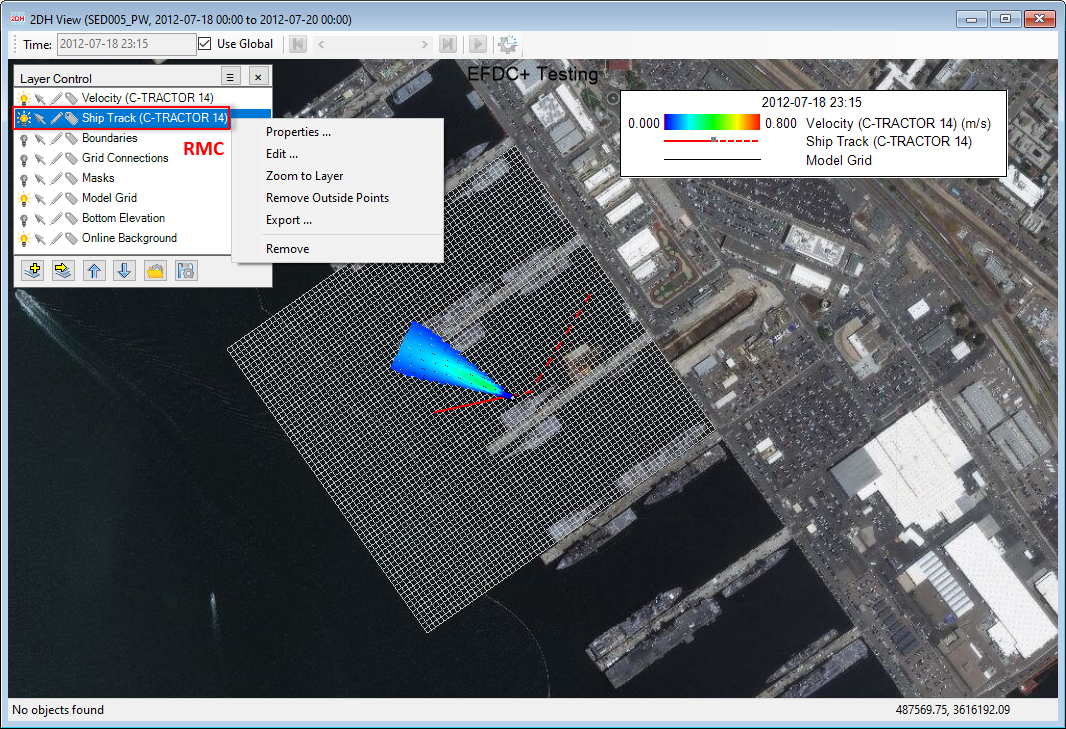
Figure 27. RMC Options for Ship Track Layer.

Figure 28. Ship Track Layer Properties form.
Input File Format for Propeller Wash
There are three input files for the propeller wash module. The files are in *.jnp format, including propwash_config.jnp, propwash_ships.jnp and propwash_tracks.jnp. These files are generated automatically by EE when the user saves the model.
The propwash_config.jnp file contains information on mesh settings and model parameters as shown in Figure 29. These fields are in the General tab of the Propeller Wash form.
propwash_ships.jnp file contains information on ships and propellers shown in Figure 30. These fields are in the Ships tab of the Propeller Wash form.
propwash_tracks.jnp file contains information on tracks for ships shown in Figure 31.
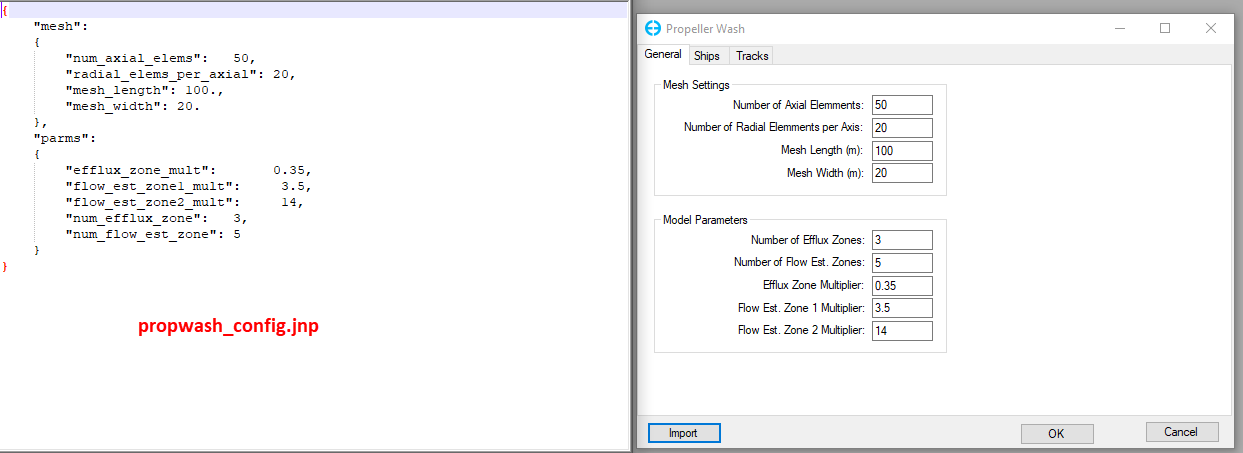
Figure 29. Propwash Configuration File.
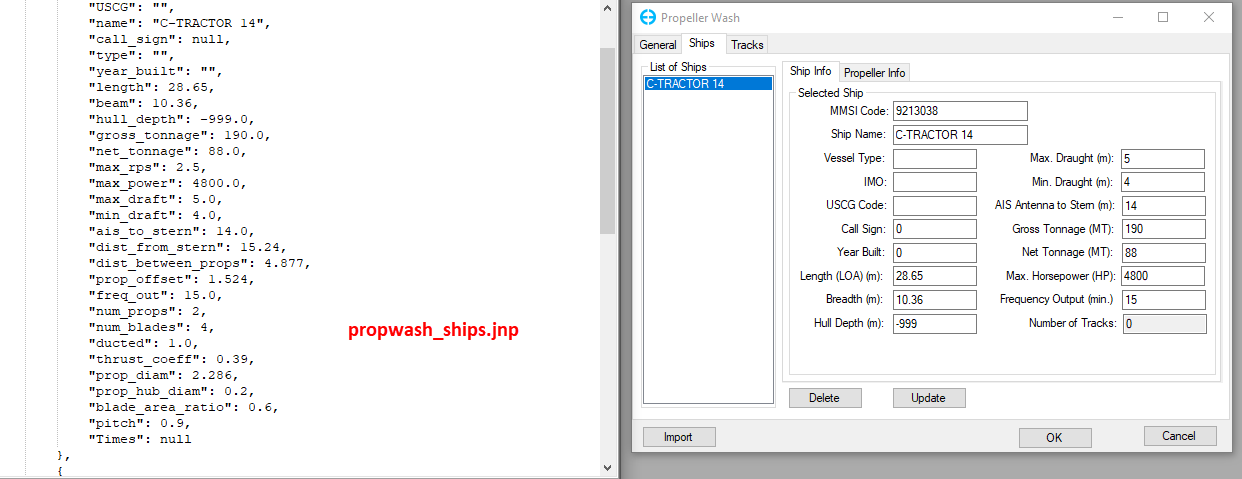
Figure 30. Propwash Ship Input File.
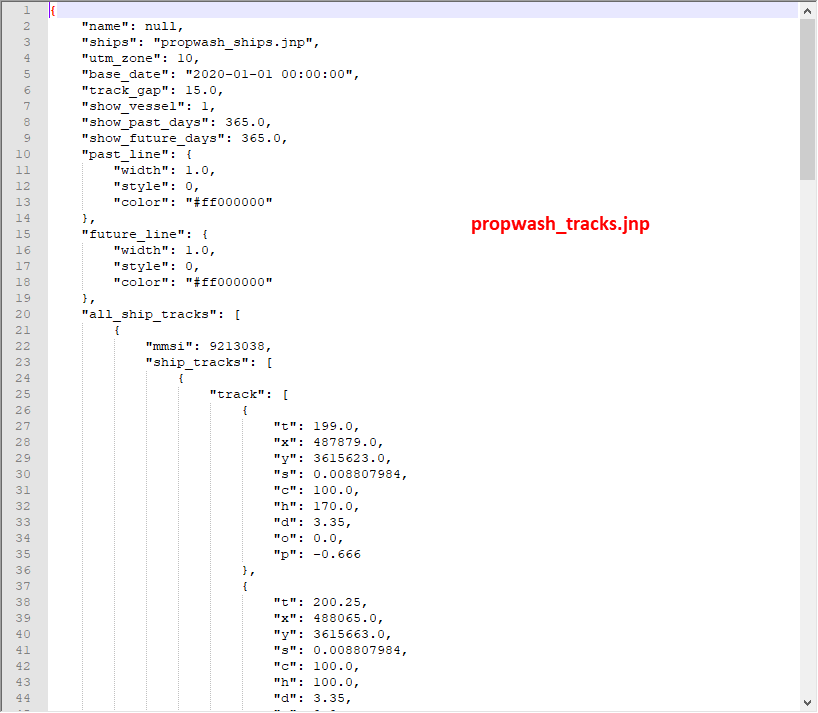
Figure 31. Propwash Tracks Input File.
Table 1 shows hotkeys list for overviewing different ships in the 2DH View.
Table 1. Hotkey to overview different ships
| Hotkeys | Feature |
|---|---|
| Delete | Delete the selected track point |
| Alt+Down | Select the previous ship on the list |
| Alt+Up | Select the next ship on the list |
| Arrow Down | Select previous track |
| Arrow Up | Select next track |
| Arrow Left | Select previous track point |
| Arrow Right | Select next track point |
| Alt+Left | Select the first track point |
| Alt+Right | Select the last track point |
References
https://www.navcen.uscg.gov/?pageName=AISMessagesA